- Install the ZingFilter Chrome extension.
- Create a ZingFilter account if you haven't already done so. You can create an account either inside the extension or on the website.
-
Find a YouTube video that you would like to filter.
-
Click the red ZingFilter extension icon in Chrome, then click Create Filter. Note: If the icon is green or yellow instead of red, there is at
least one filter for this video already. Let's suppose we want to create a filter for a scene from Jurassic Park on YouTube:

-
After clicking Create Filter, you should see the video title.
Click the Play icon to begin playing the video. If you don't see a title, or clicking Play doesn't begin playing the video, something
has gone wrong. Try reloading the video and start again. If that still fails, please contact us.

-
If everything looks good and the video begins playing, sit back, relax, and keep a finger on your keyboard's space bar. You should
quickly press the space bar to add a marker wherever needed. Whenever you hear profanity or a vulgar expression—or see something
that needs to be filtered—press the space bar. Do it for each instance throughout the video. You'll come back after the video ends
and add details about each marker. If desired, you can click the Add Marker icon instead of clicking the space bar:

-
Let's add a marker now by pressing the space bar:

The most natural way to add markers is to press the space bar when needed and continue watching the video. Then come back
at the end and enter details on all markers. Alternatively you can pause the video after each marker and add details as you go if you
choose.
-
Now that you have added a marker, some explanation is needed:
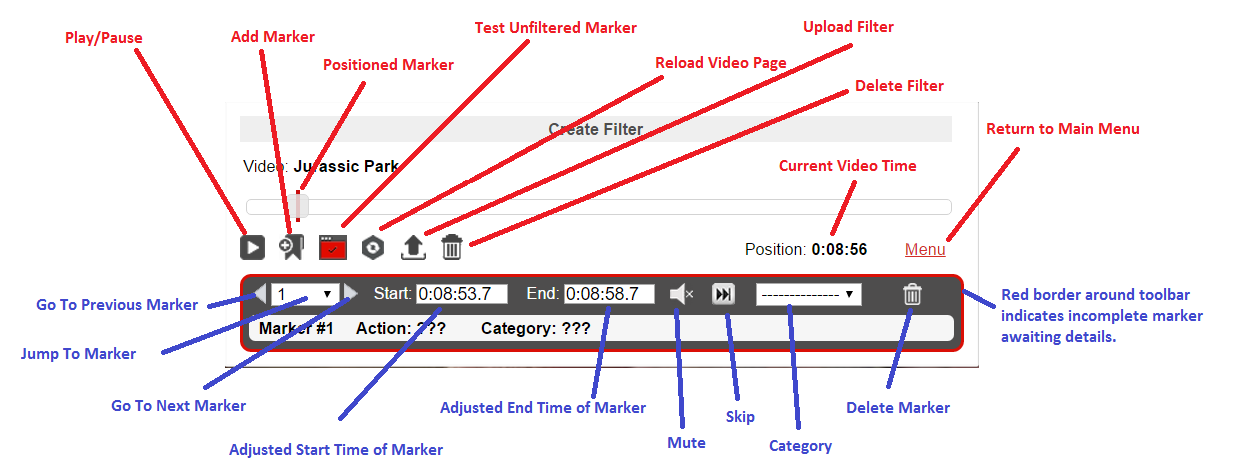
Let's visit each item in clockwise rotation, beginning from top-left:
- Play/Pause - Control video playback while working on the filter.
- Add Marker - Add a marker. You can also press the <SPACE> bar.
- Positioned Marker - the red bar that runs through the middle of the slider control.
- Test Unfiltered Marker - Click to play the unfiltered segment between the start and end times.
- Reload Video Page - Sometimes the video crashes or becomes unresponsive. Click to reload video while keeping the extension open.
- Upload Filter - Upload filter to the server. You can do this at any time, and as often as you wish. Also serves as a cloud backup of your filter.
- Delete Filter - Be careful; this deletes the entire filter. If you have uploaded the filter it will only be deleted locally and you'll still have it on the server.
- Current Video Time - The current elapsed time of the video. This updates in realtime as the video plays.
- Return to Main Menu - Return to the main menu.
- Red Border - The red border around the toolbar indicates an unfinished filter, which means one or more markers don't have required details yet.
- Delete Marker - Delete just this marker; not the entire filter. This is convenient for when you add a marker by mistake.
- Category - The category of the mute or skip. (Language, Obscenity, Violence, Nudity, Sexuality, Disturbing)
- Skip - Cause the marker to skip an offensive segment of the video.
- Mute - Cause the marker to mute an offensive segment of the video.
- Adjusted End Time of Marker - The adjusted end time of the marker is a few seconds after the point at which you added the marker.
- Adjusted Start Time of Marker - The adjusted start time of the marker is a few seconds before the point at which you added the marker.
- Go To Next Marker - Go to the next marker.
- Jump To Marker - Jump to any marker in the filter.
- Go To Previous Marker - Go to the previous marker.
-
Let's return to the first marker
by jumping to it via the Go To Marker pulldown. Each marker must be set as either a mute or a skip. For
the sake of the example, I have set Marker #1 as a mute, set the category to Language, and typed the first 2 letters
of the word to mute out in the autocomplete box. In this case I typed "he", and then was able to select the word. When selecting
a category of Language, you must also enter into the autocomplete box which word was muted out. To do this, simply type the first
2 letters of the word, then select the word. Typing only 1 letter of the word will do nothing. You can also click the eye icon
to view all cuss words and select one, if that is easier for you. If a word or phrase needs to be muted out but it doesn't
appear in our list of words, most likely you should choose the Obscenity category instead of language.

Important: The Start and End times are just approximations to get you in the vicinity of the marker. You will need to adjust
these times in all cases. Use the arrows on your keyboard to adjust and refine the start and end times so that you surgically
remove offensive content and nothing before or after that. After you have entered the required details about your marker,
you'll want to click the Test Filtered Marker icon, which will play the segment containing your mute or skip, plus a few seconds
before and after the mute or skip.
Testing the filtered marker is essential, and will often need to be re-tested several times, adjusting the start/end times
after each test. When you have it perfect, move on to the next marker.
-
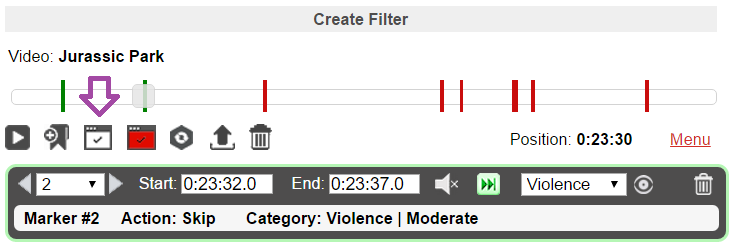
Now suppose there is a violent scene we want to skip, such as when the dinosaur eats the lawyer. I have clicked
the Skip icon (instead of Mute), set the category to Violence and the severity to Moderate. It would
be reasonable to set the Category to Disturbing instead of Violence, but I thought this was more closely aligned with Violence.
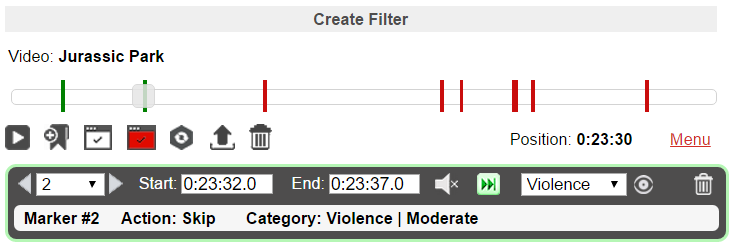
When selecting any category except Language, a box will pop up requiring you to choose a Severity level. Notice
the link titled Detailed descriptions to help you decide. You should carefully read these descriptions
and adhere as closely as possible to that guidance, in order to have consistency across all filters.

-
Continue through each marker and get them perfect. Then upload the filter one final time. It is recommended, though not required,
to watch your video filtered once more from beginning to end, with the extension box closed, as a normal user would. As you're
watching the video with your filter applied (the ZingFilter icon will turn green if the filter is matched and engaged), there
are some very handy keyboard shortcuts to help identify and track any filtering problems you may discover.
-
Upload the filter, and other ZingFilter users will be able to start enjoying your filter and rating it.
|